WaitForSeconds and Time.timeScale = 0

So, it turns out that Unity’s WaitForSeconds is using scaled time, which means that you can experience all sorts of weirdness when waiting for a precise number of seconds and scaling time, say in a pause screen.

using System.Collections;
using UnityEngine;

public class Pause : MonoBehaviour
{
	void OnEnable()
	{
		Time.timeScale = 0f;
		StartCoroutine(Countdown(3));
	}		

	IEnumerator Countdown(int duration)
	{
		while (duration > 0)
		{
			duration --;
			yield return new WaitForSeconds(1f); // will wait for ever!
		}
		Time.timeScale = 1f;
	}
}

You might think that the code above should work as intended, but no, it will never finish and instead stall on the yield, as WaitForSeconds uses Time.deltaTime. It also means that if you have scaled your time to anything other than 1, it will give interesting results: 0.5 will make every second last 2 seconds instead.

The simplest solution I’ve come up with is to make a custom method for it, WaitForUnscaledSeconds which looks at Time.unscaledDeltaTime but otherwise functionally behaves differently. Like so:

using System.Collections;
using UnityEngine;

public class Pause : MonoBehaviour
{
	void OnEnable()
	{
		Time.timeScale = 0f;
		StartCoroutine(Countdown(3));
	}		

	IEnumerator Countdown(int duration)
	{
		while (duration > 0)
		{
			duration --;
			yield return WaitForUnscaledSeconds(1f); //note: there is no "new" keyword.
		}
		Time.timeScale = 1f;
	}

	IEnumerator WaitForUnscaledSeconds(float dur)
	{
		var cur = 0f;
		while (cur < dur)
		{		
			yield return null;
			cur += Time.unscaledDeltaTime;
		}
	}
}

Since the WaitForUnscaledSeconds is a method, we don’t instantiate it with the ‘new’ keyword, but instead just call it. In the example above, we could cook it down even more, as the Countdown method isn’t really needed, but I’ve left it since you would usually do other functionality in there.

To make it entirely identical to the WaitForSeconds, you would have to make a new class that extends YieldInstruction, but I didn’t really want to go that direction with it. You could also extract it to a static utility class rather than have it embedded in the particular monobehaviour here, but I’ll leave all the expansions up to you.

I hope this will help a few poor souls that are confused why their WaitForSeconds stopped working.
Masking and clipping textures in Unity 5.4, NGUI 3.9.8

Two and a half years ago I made http://nickithansen.dk/masking-and-clipping-textures-using-shaders-in-ngui/ which in the mean time has broken in various ways. Ankh, in the comments, was kind enough to remind me to do something about that, so here is a new version that works in the newest versions of Unity3D and NGUI.

Shader "Custom/MaskClipShader 1" 
{
  Properties 
  {
	_MainTex ("Base (RGB), Alpha (A)", 2D) = "white" {}
	_AlphaTex ("MaskTexture", 2D) = "white" {}
  }
 
  SubShader
  {
	Tags{
	  "Queue" = "Transparent"
	  "IgnoreProjector" = "True"
	  "RenderType" = "Transparent"
	}
	 Pass
	{
		Cull Off
		Lighting Off
		ZWrite Off
		Offset -1, -1
		Fog { Mode Off }
		ColorMask RGB
		Blend SrcAlpha OneMinusSrcAlpha
		
		CGPROGRAM
		#pragma vertex vert
		#pragma fragment frag
		#include "UnityCG.cginc"

		sampler2D _MainTex;
		float4 _MainTex_ST;
		sampler2D _AlphaTex;
		float4 _ClipRange0 = float4(0.0, 0.0, 1.0, 1.0);
		float2 _ClipArgs0 = float2(1000.0, 1000.0);

		struct appdata_t
		{
			float4 vertex : SV_POSITION;
			half4 color : COLOR;
			float2 texcoord : TEXCOORD0;
		};

		struct v2f
		{
			float4 vertex : SV_POSITION;
			half4 color : COLOR;
			float2 texcoord : TEXCOORD0;
			float2 worldPos : TEXCOORD1;
		};

		v2f vert (appdata_t v)
		{
			v2f o = (v2f)0;
			o.vertex = mul(UNITY_MATRIX_MVP, v.vertex);
			o.color = v.color;
			o.texcoord = v.texcoord;
			o.worldPos = v.vertex.xy * _ClipRange0.zw + _ClipRange0.xy;
			return o;
		}

		half4 frag (v2f IN) : SV_Target
		{
			float2 factor = (float2(1.0, 1.0) - abs(IN.worldPos)) * _ClipArgs0;
			
			half4 col = tex2D(_MainTex, IN.texcoord) * IN.color;
			half4 maskAlpha = tex2D(_AlphaTex, IN.texcoord);
			col.a *= clamp(min(factor.x, factor.y), 0.0, 1.0);
			col.a *= maskAlpha.a;
			return col;
		}
		ENDCG
	}
  }
}

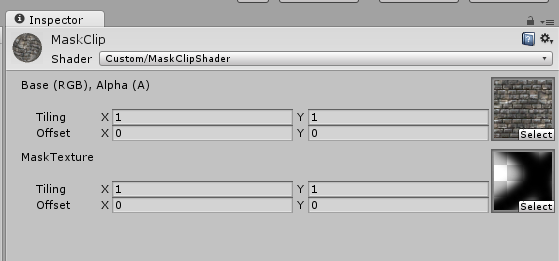
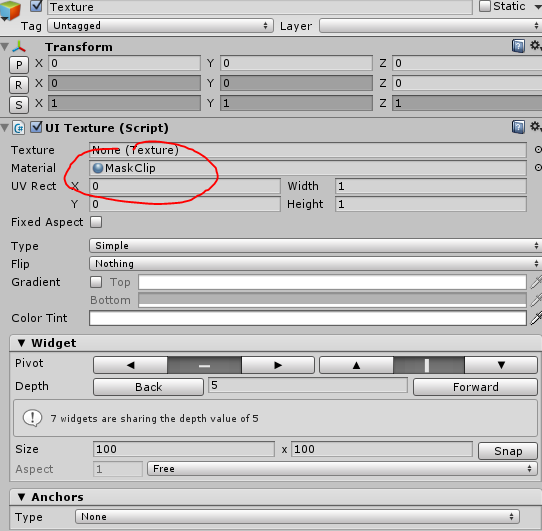
To use it, you create a custom material for your texture and assign it to a UITexture inside your clipping panel as you would a normal texture or sprite. Be sure to use the “Custom/MaskClipShader” shader for the material, and there you go. It accounts for soft clipped edges as well.

uitexture custommaterial

And here’s the unclipped version, which only masks a UITexture

Shader "Custom/MaskClipShader" 
{
  Properties 
  {
    _MainTex ("Base (RGB), Alpha (A)", 2D) = "white" {}
    _AlphaTex ("MaskTexture", 2D) = "white" {}
  }
 
  SubShader
  {
    LOD 100
 
    Tags{
      "Queue" = "Transparent"
      "IgnoreProjector" = "True"
      "RenderType" = "Transparent"
    }
 
    Pass 
    {
      Cull Off
      Lighting Off
      ZWrite Off
      Fog { Mode Off }
      Offset -1, -1
      ColorMask RGB
      AlphaTest Greater .01
      Blend SrcAlpha OneMinusSrcAlpha
      ColorMaterial AmbientAndDiffuse
 
      SetTexture [_MainTex] 
      {
        Combine Texture * Primary
      }
 
      SetTexture [_AlphaTex] 
      {
        Combine previous, texture
      }
    }
  }
}

Masking and clipping textures using shaders in NGUI

A question that showed up on Tasharen’s forum, where I happen to be a moderator, was this one:

(..) I have a panel that’s draggable and clipped, which displays a list of GameObjects, each one composed of usernames, avatars, and some other text.

The avatars are not square, they have an hexagonal mask. To achieve this, they are Texture widgets with a special shader I found here. (..) when they get clipped by the panel, they keep showing even outside the boundaries. Only when completely out of sight, they get hidden(..).

Source: http://www.tasharen.com/forum/index.php?topic=5621

First: the reason it gets disabled when its entirely outside the clip area is the way NGUI culls widgets by simply not drawing them. It’s not that the gameObject is disabled, but the UIPanel does not feed this widget into the UIDrawCall’s geometry which is the thing that gets drawn on screen.

The shader he used for the masking was obtained at http://www.zedia.net/2013/masking-textures-using-shaders-ngui/ who based the shader on the old non-clipping version of NGUIs builtin Transparent Alpha shader (it has since changed to not use the combine keyword).

This doesn’t work with the different clipping options that NGUI uses (Alpha Clipping, Soft Clipping) since the UIPanels change the shader used and also feed in the coordinates where it needs to be clipped. It’s very worth noting that the way the UIPanel chooses shaders is entirely based on the name of the shader. This means that when you make a new shader, you should make a similar named shader but with ” (AlphaClip)” added to it, so it’s used when alpha cliping is enabled.

// If clipping should be used, we need to find a replacement shader
if (useClipping && mClipping != Clipping.None)
{
Shader shader = null;
const string alpha = " (AlphaClip)";
const string soft = " (SoftClip)";

// Figure out the normal shader's name
string shaderName = mSharedMat.shader.name;
shaderName = shaderName.Replace(alpha, "");
shaderName = shaderName.Replace(soft, "");

// Try to find the new shader
if (mClipping == Clipping.HardClip ||
mClipping == Clipping.AlphaClip) shader = Shader.Find(shaderName + alpha);
else if (mClipping == Clipping.SoftClip) shader = Shader.Find(shaderName + soft);

Source: UIDrawCall.cs in NGUI.

Note also that the former HardClipping is entirely deprecated and just changes to be AlphaClip under the surface.

Here’s a shader that works with Alpha Clipping based on the Transparent Colored (AlphaClip) builtin shader in NGUI:

Shader "Custom/MaskClipShader (AlphaClip)" 
{
  Properties 
  {
    _MainTex ("Base (RGB), Alpha (A)", 2D) = "white" {}
    _AlphaTex ("MaskTexture", 2D) = "white" {}
  }

  SubShader
  {
    LOD 100

    Tags{
      "Queue" = "Transparent"
      "IgnoreProjector" = "True"
      "RenderType" = "Transparent"
    }
     Pass
		{
			Cull Off
			Lighting Off
			ZWrite Off
			Offset -1, -1
			Fog { Mode Off }
			ColorMask RGB
			Blend SrcAlpha OneMinusSrcAlpha

			CGPROGRAM
			#pragma vertex vert
			#pragma fragment frag
			#include "UnityCG.cginc"

			sampler2D _MainTex;
			float4 _MainTex_ST;
			sampler2D _AlphaTex;

			struct appdata_t
			{
				float4 vertex : POSITION;
				half4 color : COLOR;
				float2 texcoord : TEXCOORD0;
			};

			struct v2f
			{
				float4 vertex : POSITION;
				half4 color : COLOR;
				float2 texcoord : TEXCOORD0;
				float2 worldPos : TEXCOORD1;
			};

			v2f vert (appdata_t v)
			{
				v2f o;
				o.vertex = mul(UNITY_MATRIX_MVP, v.vertex);
				o.color = v.color;
				o.texcoord = v.texcoord;
				o.worldPos = TRANSFORM_TEX(v.vertex.xy, _MainTex);
				return o;
			}

			half4 frag (v2f IN) : COLOR
			{
				// Sample the texture
				half4 col = tex2D(_MainTex, IN.texcoord) * IN.color;
				half4 a2 = tex2D(_AlphaTex, IN.texcoord);

				float2 factor = abs(IN.worldPos);
				float val = 1.0 - max(factor.x, factor.y);

				// Option 1: 'if' statement
				if (val < 0.0) col.a = 0.0;
				if (a2.a < col.a) col.a = a2.a;

				// Option 2: no 'if' statement -- may be faster on some devices
				//col.a *= ceil(clamp(val, 0.0, 1.0));

				return col;
			}
			ENDCG
		}
  }
}

You will have to use the non clipping shader that was provided on the other blog or make one based on the new version of the Transparent Colored shader in NGUI. This shader will get all sorts of weird if you use it in a non-clipping panel.

Clipping and masking using a modified example 7 in NGUI
Custom material with a alpha-8 mask texture

I use a custom Material which I put onto a UITexture. If you instantiate the material, you can feed it different mainTextures such as facebook images or something similar.

I hope this will be helpful to someone.

Nicki.

New website

Hello folks.

I’ve decided to change my website to use wordpress as a base, which will make it easier to make blogposts about stuff I think are interesting. I looked into the solutions for blogs out there, tumblr, blogger but none of them seemed really to offer the freedom I wanted. I first implemented wordpress as a separate blog section on the site, but since the styles clashed and wordpress is so easy to work with, I figured I might as well move the whole thing, and that’s where we are now.

I hope to do some blogging about tips and tricks with Unity3D, NGUI and the other goodies I work with for a living.

Nicki.